


Today is a very special video, as we’ll be going over a topic that many of you have been requesting on this channel. In today’s video, we’ll be demonstrating from beginning to end how to apply our full coverage extension tips, or as we like to call them Gelips. While we’ve wanted to do this video for awhile, we thought that you should learn from the best. Very graciously, Koko Kashiwagi, our founder and CEO of KOKOIST offered to demonstrate how to apply these Gelips on yours truly today. So without further ado let’s get into the video!
Before I start getting into the nitty gritty, I’d like to preface that there are two ways to apply Gelips. One of these ways uses Mega Stick, while the other uses Bonding Duo. Even though the methods are very similar, there are a couple of key differences if you're going to use either base. In this video, we’ll be showing you both ways and throughout the video, we’ll go more into detail on when you should use Mega Stick Base and when you should use Bonding Duo in a bottle.
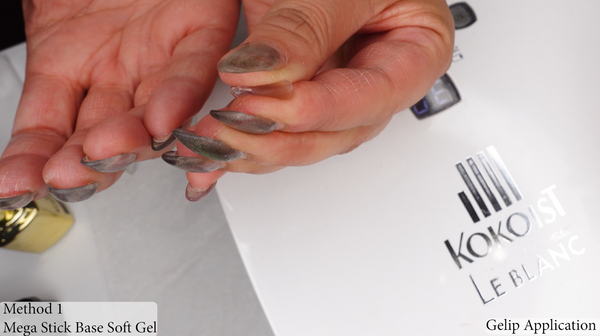
METHOD ONE: MEGA STICK SOFT BASE GEL
Now that we have that out of the way we can start with the actual application. We’ve already gone ahead and pre-sized all my nails to match, making sure that each Gelip covers my nail sidewall-to-sidewall. If you’ve seen Paola’s video here on this channel on Gelips Do’s and Don'ts (which I’ll link so you can watch if you haven’t seen it yet), you’ll know that pre-sizing will help you be more efficient when it comes down to the application. So here we’ve already gone and done that to my nails.

We also want to make sure that we’re thoroughly prep-ing our nails with our sponge buffer or 180 grit emery board to get rid of any shine so that the nail creates a tighter bond with the extension. Without a good prep, our nails will be much more prone to “popping-off” which is probably the last thing we want.

Now that we’ve pre-sized and prepped our nails with a file, we’re taking our lint-free cotton wipes to thoroughly wipe down each nail with 90% alcohol. Kokoist products do not require the use of primer or bonder in our application so all we have to do is remove any dirt or debris left on the nail with our alcohol. This is a really important step, as anything that is not gel left on the nail will cause lifting.

We’re also going to make sure that we wipe down each Gelip with our 90% alcohol for the same reasons. Please make sure you absolutely do not skip this step as Koko-san says, as it will help to ensure that the Gelip is long-lasting and sturdy. Since Kokoist Gelips are pre-etched, you do not need to prep the Gelips any further with a file than already is. Just make sure that you are wiping each gelip down and you are good to go.

In this method we’ll be using Mega Stick Base Soft Gel to apply the Gelips on my right hand. Mega Stick Base is good for clients or people who’s nails come off easily or those who have bendy soft nails. First Koko paints a thin coat of the Mega Stick to each of my nails. After applying the Mega Stick to all my nails, I stuck my hand into the light, letting it cure for a full 30 seconds before moving on.

When we apply the Gelip we want to make sure that the Gelip tip fits comfortably on the nail. It’s better for the nail to be on the larger size, rather than being too tight and not fitting the nail sidewall to sidewall. We can always file down the Gelip later to more seamlessly fit with the nail bed. We’re going to apply it a little bit away from the cuticle as well to make a more flawless blend with the natural nail.
Before we apply the Gelip on the nail, Koko likes to roll the gelip between her hands to create a curve in the nail. Since Gelips are made with a specialized ABS plastic it won’t break or snap easily, allowing you to roll out the Gelip and create the perfect apex. By curving the Gelip, you also create a pocket for the gel to sit in.

Then we’ll take out Mega Stick Base and generously apply into the pocket we’ve created. Koko only applies the gel about 2/3rds up from the base of the gelip on the pre-etched matte portion. Once she paints that, she’ll take the rest of the gel on the brush and create a dollop on the very base of the gel.

Then with a light hand we’ll take the same gel to tap on some of that Mega Stick to the tip of the nail.

Now here is the cool part. Take your Gelip and place gently about 2mm past the base of the nail and hold, but don’t completely press down on the nail to leave a small pocket of air.

Use the milk cake light and while the light is on, press down all the way completely, allowing it to flash cure while you press down. This will remove all the air out from under the nail.
And remember that gel we put on the edge of the nail earlier? We do this to “stop” the gel from overflowing past the free edge. By doing this you won’t have to worry too much about putting too much gel on. You never want to apply too little gel or it won’t cover the whole nail and again, cause lifting.

And ta-da! Here they are all applied nice and pretty. Remember once you’re done with all nails to allow for a full cure of 60 seconds in your regular nail lamp. The milk cake light won’t be strong enough to fully cure the nails.

Now that we have them all applied, we’ll take the e-file to smooth down the Gelip and essentially blend it in with the natural nails. If you don’t have an e-file, a regular file will work just fine, but it will just take a little more time. Be careful not to file your actual nail down and cause damage to your real nails.

Once we’re done blending the edges to the natural nail. Koko is going to take the 180 grit Emery Board to gently remove the shine and create a rough surface on the gelips. Then she takes the Sponge Buffer to further remove the shine and get it prepped for our gel that we’ll be applying on top. If you feel like the edges need a little blending you can take your medium grit file to smooth that down.

Like we prepped on the natural nails, once again, we’ll take our lint free cotton wipe with 90% alcohol to remove any debris.

One last time, we’ll take our Mega Stick to apply a layer over the entire nail. Do this to every nail and cure again for 30 seconds.

This is the part where we finally get to add our color. Of course, you can add any color you’d like but for today’s video we went ahead and applied E-203S Pink Dragon with the Round Brush. And we’ll cure that again for 20-30 seconds depending on your lamp.

On top of that, Koko applied Unicorn’s Eye, using the magnet to activate the particles as shown here. Then we cured that again for 20-30 seconds.

Finally, she applied a thin line around the nail with ML-05 Thick Bronze using the Long Liner.

When we use the Mega Stick Base or any soft gel to apply Gelips, typically we’ll want to use a harder top coat such as the Stain Barrier. Reason being, when we use soft gel we want to add strength as the last step so that the Gelip doesn’t bend the other way and break off. We’re going to add the top coat a little more generously than we would normally and flash cure 5 seconds one-by-one to hold the shape. Once we finish applying the Stain Barrier to all the nails, we’ll fully cure for 30 seconds for one last time.

For the finishing touches, Koko goes in with the file to shape up the nails before we’re finished. As a side note, for this method, you can easily switch out Mega Stick Base Soft Gel for the Nail Thought’s Clear Builder Base or any of the Nail Thoughts Tinted Bases. Just make sure you’re using a harder top-coat to account for the softer type gels when using Gelips.

And voila! You’re finally done! Now that we’re done with the right hand, let’s move on to the left hand using Bonding Duo in A Bottle!
BONDING DUO IN A BOTTLE
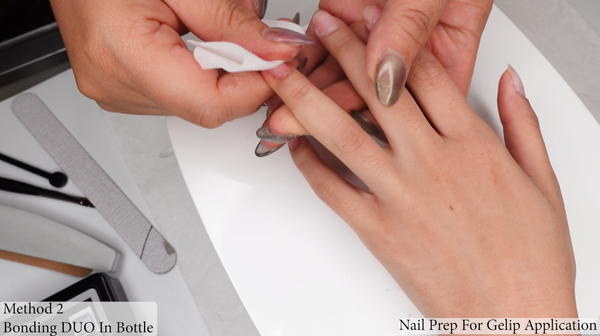
First, we’re going to go through again and prep the nails with our alcohol and wipe.
You’ll see in this method that it’s almost identical to the one we just did, except that we’ll be using Bonding Duo in a Bottle. Due to the similarities, we’ll be speed running through a couple steps for time’s sake. Some of you may even be surprised that you can use Bonding Duo in A Bottle to apply Gelips. But it is possible! Just make sure you’re keeping a couple things in mind.
Firstly, Bonding Duo is great on its own, but again if you or your client is someone who has more bendy nails, you can use both Mega Stick and Bonding Duo. On the other hand, for clients who already have strong natural nails, you can use Bonding Duo on its own. Since Bonding Duo is more thick, it’s great for people who want to take their time with the process since it won’t run as quickly as softer gels.

For the purposes of this video, Koko does both ways, but naturally you’ll want to stick to one system throughout the manicure. We want to show a variety of ways so you can find the one that works the best for you.

Once we’ve cured the first layer for 30 seconds using either Mega Stick or Bonding Duo, we’ll roll out and add the Bonding Duo to the pocket we’ve created in the gelip. Then again like we’ve done previously, we’ll add a light tap of the Bonding Duo on the tip of the nail to stop it from overflowing.

We’re going to take that Gelip, place it a little past the base of the nail and hold, but not completely press down the Gelip on the nail to initially leave a small pocket of air. Use the Milk Cake Light while the light is on, press down all the way completely, allowing it to cure while you press down to remove all the air out from under the nail. Koko calls this method “shuuuuu” as if air was coming out of a balloon. Pretty nice, right?

After we’re done attaching all the Gelips and giving it a nice full 60 second cure with our curing lamp, she takes the e-file to smooth down the Gelip and blend the edges in with the natural nails.
Now we take our file and rough the tops of the Gelips and we’ll finish our prep by wiping it down with alcohol.
 Then finally, we’ll add one more layer of the Bonding Duo in A Bottle to marry the natural nail with our Gelip extensions before we move on to color.

Again, we apply our color E-203S Pink Dragon to all the nails.

After that, we apply the Unicorn’s Eye and use the magnet to activate the particles.

Finally, we’ll add our detail line around the nail with the Markers Line Thick Bronze.

This time instead of the Stain Barrier, we’re going ahead and using the Ultra Glossy Top Coat. Since we already have that layer of strength when we added the Bonding Duo, we don’t have to worry too much about it bending or snapping backwards.
Finally, we’re going through with the last perfecting touches with our hand file. And once we dust it off, we’re done!

P.S. If you ever want to accentuate the look of the Unicorn’s Eye in your photos and videos, shine a bright light from your phone to really make that holographic effect pop. Natural light will also make the Unicorn’s Eye and all your magnetic gels really shine.
And that’s it for the video today! I know there was a lot of information in this video, but you can always go back to this video if you’re feeling lost. I hope this video was able to assist in some way. And as always, thank you so much for watching. I’ll see you all next time in the next video.


